
Imagine asking your AI assistant to run an nmap scan, parse the results, pivot to a web enumeration, spot a vulnerability, and suggest an exploit.. all in a single conversation. That's not science fiction anymore. That's what you get when you connect Claude Desktop to a Kali Linux machine via the Kali MCP Server.
This guide walks you through the full setup from scratch. It is intended to work on both macOS and Windows as the host running Claude Desktop, with Kali Linux inside a virtual machine, though it has been tested exclusively on macOS.
⚠️ Disclaimer
This tool gives an AI model direct shell access to your Kali Linux machine. That is an extraordinarily powerful capability.
- Only use this against systems you own or have explicit written authorization to test.
- Never expose the API server to the public internet.
- Unauthorized access to computer systems is a criminal offense in most jurisdictions.
- The authors of
mcp-kali-server, Kali Linux, and Anthropic bear no responsibility for misuse.
This setup is for lab environments, CTF challenges, and authorized red team engagements only. 🔒
🧠 What Is This, Exactly?
MCP (Model Context Protocol) is an open standard that lets AI models talk to external tools and services. Think of it like a USB port for AI. Plug in a server and suddenly the model can do things it couldn't do before.
The Kali MCP Server is one such plug-in. It exposes a controlled API that Claude can call to execute terminal commands on a Kali Linux machine. Claude doesn't just suggest commands anymore, it runs them, reads the output, reasons about it, and decides what to do next.
🗺️ Architecture
Here's how the pieces fit together:
Claude Desktop
MCP client — spawns the bridge on startup
client.py
MCP bridge — translates tool calls to HTTP requests
ssh -L 5000:127.0.0.1:5000
Port never exposed to the network
kali-server-mcp
Flask API on 127.0.0.1:5000 — executes commands, returns output
nmap / gobuster / sqlmap / metasploit…
Any tool on Kali — output streamed back to Claude
📋 Requirements
Before starting, make sure you have everything in place:
| Requirement | Details |
|---|---|
| 🖥️ Windows/MacOS host | Any recent version (tested on macOS 26) |
| 🐉 Kali Linux | Inside a VMware VM (Workstation, Fusion, or Player) |
| 🐍 Python 3.10+ on macOS | Required by the MCP bridge (client.py). Check with python3 --version |
| 🔑 SSH access to the Kali VM | Must be enabled and reachable from the host |
| 🤖 Claude Desktop | Downloaded from claude.ai/download |
| 👤 Anthropic account | Free or Pro at claude.ai |
🐍 Python version check:
python3 --version
# Must be 3.10 or higher — e.g. Python 3.12.x
If you're on an older version, install a newer one via Homebrew: brew install [email protected]
Step 1 - Install Claude Desktop 🖥️
⚠️ Claude Desktop is available for macOS and Windows only. There is no native Linux build.
Download Claude Desktop from claude.ai/download.
- macOS: Open the
.dmgand drag Claude to Applications. - Windows: Run the
.exeinstaller.
Launch Claude Desktop, sign in with your Anthropic account, and confirm you can hold a basic conversation. Once that works, you're ready to supercharge it.
Step 2 - Enable SSH on Kali 🔐
The SSH tunnel that secures the connection between your Mac and the Kali VM depends on SSH being up and running inside Kali. Let's make sure it is.
Check if SSH is already running:
sudo systemctl status ssh
If you see active (running) in green, you're good — skip to Step 3.
If it's inactive or not found:
# Install OpenSSH server if missing
sudo apt update && sudo apt install -y openssh-server

# Start the service
sudo systemctl start ssh

# Enable it to start automatically at boot
sudo systemctl enable ssh

# Verify it's running
sudo systemctl status ssh
Find the Kali VM's IP address (you'll need this for the tunnel):
ip a | grep "inet " | grep -v 127
Note the IP, it will look something like 192.168.x.x or 10.x.x.x depending on your VMware network mode.
Test SSH from your Mac:
ssh your-kali-user@KALI_VM_IP
If you can log in, SSH is working. Exit and continue.
💡 VMware network tip: For the cleanest lab setup, use NAT (default) or Host-only networking. Both allow SSH from the macOS host to the VM.
Step 3 - Install mcp-kali-server on Kali 🐉
On your Kali machine, install the package:
sudo apt update
sudo apt install mcp-kali-server
This installs:
kali-server-mcp— the Flask API that executes terminal commands.mcp-server— the MCP bridge binary (not used directly in this setup since the bridge runs on macOS).
Step 4 - Start the Kali API Server ▶️
On your Kali machine, start the API server. Leave this terminal open for the entire session.
kali-server-mcp
Expected output:
 * Running on http://127.0.0.1:5000
 * Debug mode: off
The server binds only to 127.0.0.1, so it is not directly reachable from outside the VM. The SSH tunnel in the next step handles the secure forwarding.
Step 5 - Clone the MCP Bridge on macOS 🍎
Claude Desktop needs to launch the MCP bridge (client.py) as a local subprocess on your Mac. Clone the repo somewhere outside of protected macOS folders like ~/Desktop or ~/Documents — those require special permissions and will cause a [Errno 1] Operation not permitted error.
# Clone directly into your home directory (no permission issues)
git clone https://github.com/Wh0am123/MCP-Kali-Server.git ~/MCP-Kali-Server

# Set up a virtual environment
python3 -m venv .venv
source .venv/bin/activate
pip install -r requirements.txt
⚠️ If you accidentally cloned into ~/Desktop, move it now:
mv ~/Desktop/MCP-Kali-Server ~/MCP-Kali-Server
Then update any paths in the config accordingly. macOS sandboxes apps away from Desktop and Documents, always use your home directory or a subdirectory of it.
Verify the bridge script is present:
ls ~/MCP-Kali-Server/
# You should see: client.py  server.py  requirements.txt  README.md ...
🪟 Windows users: The steps in this section are nearly identical on Windows. Clone the repo to a safe path like C:\Users\YOUR_USERNAME\MCP-Kali-Server\ and avoid Desktop or Documents for the same permission reasons. Use python -m venv .venv, .venv\Scripts\activate, and pip install -r requirements.txt. The config paths for Claude Desktop are covered in Step 7.
Step 6 - Open the SSH Tunnel 🔑
Open a new terminal on your Mac and run:
ssh -N -L 5000:127.0.0.1:5000 your-kali-user@KALI_VM_IP
| Flag | What it does |
|---|---|
-N |
Don't open a shell — just forward the port |
-L 5000:127.0.0.1:5000 |
Forward local port 5000 → Kali's localhost port 5000 |
Leave this terminal open. As long as it's running, http://127.0.0.1:5000 on your Mac points directly to the Kali API server.
Verify the tunnel is working:
# In a separate terminal on your Mac
curl http://127.0.0.1:5000
Any response confirms the tunnel is up. ✅
💡 Optional - Persist the tunnel with SSH config
Add this to ~/.ssh/config on your Mac to avoid retyping the command every session:
Host kali
    HostName KALI_VM_IP
    User your-kali-user
    LocalForward 5000 127.0.0.1:5000
    ServerAliveInterval 60
    ServerAliveCountMax 3
Then connect with just:
ssh -N kali
Step 7 - Configure Claude Desktop ⚙️
Open the Claude Desktop config file:
# macOS
open "~/Library/Application Support/Claude/"
# Then edit claude_desktop_config.json
Or edit directly from the terminal:
nano ~/Library/Application\ Support/Claude/claude_desktop_config.json
On Windows, the file is at %APPDATA%\Claude\claude_desktop_config.json.
Add the following config, replacing the username with your actual macOS username:
macOS:
{
  "mcpServers": {
    "kali": {
      "command": "/Users/YOUR_USERNAME/MCP-Kali-Server/.venv/bin/python3",
      "args": [
        "/Users/YOUR_USERNAME/MCP-Kali-Server/client.py",
        "--server",
        "http://127.0.0.1:5000",
        "--timeout",
        "300"
      ]
    }
  }
}
Windows (if Kali is in a VM and the bridge is cloned locally):
{
  "mcpServers": {
    "kali": {
      "command": "C:\\Users\\YOUR_USERNAME\\MCP-Kali-Server\\.venv\\Scripts\\python.exe",
      "args": [
        "C:\\Users\\YOUR_USERNAME\\MCP-Kali-Server\\client.py",
        "--server",
        "http://127.0.0.1:5000",
        "--timeout",
        "300"
      ]
    }
  }
}
💡 Always use absolute paths. Claude Desktop does not inherit your shell's PATH.
Find your exact Python path with:
Step 8 - Restart Claude Desktop 🔄
A config change only takes effect after a full restart — closing the window is not enough.
- macOS:
Claude menu → Quit Claude, then relaunch. - Windows: Right-click the system tray icon → Quit, then relaunch.
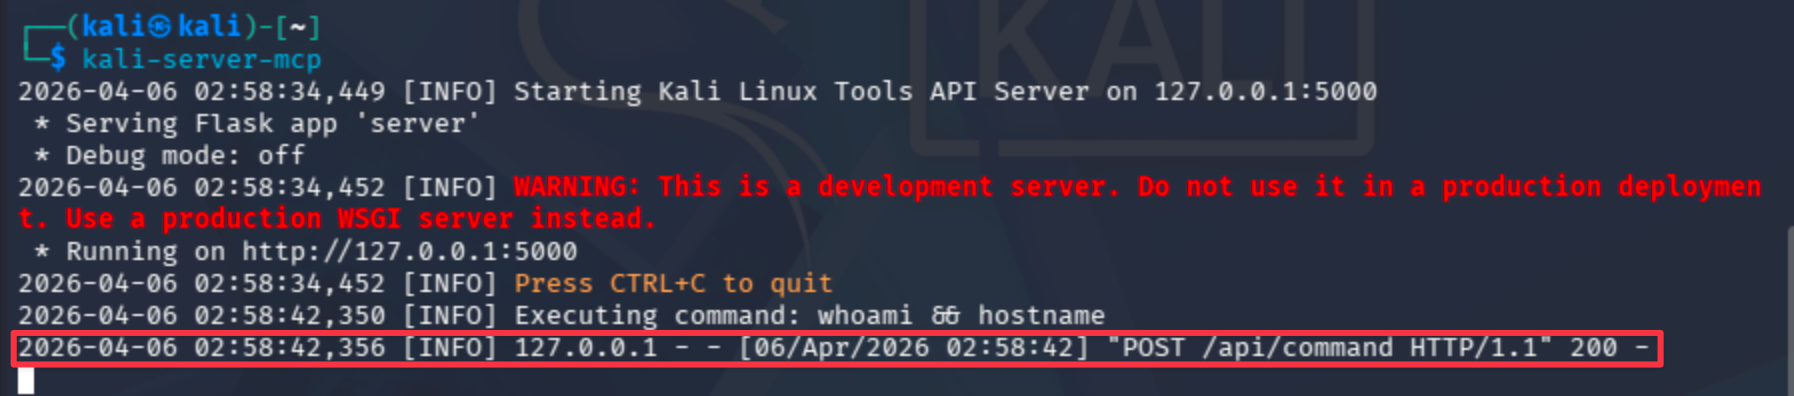
Step 9 - Verify the Connection ✅
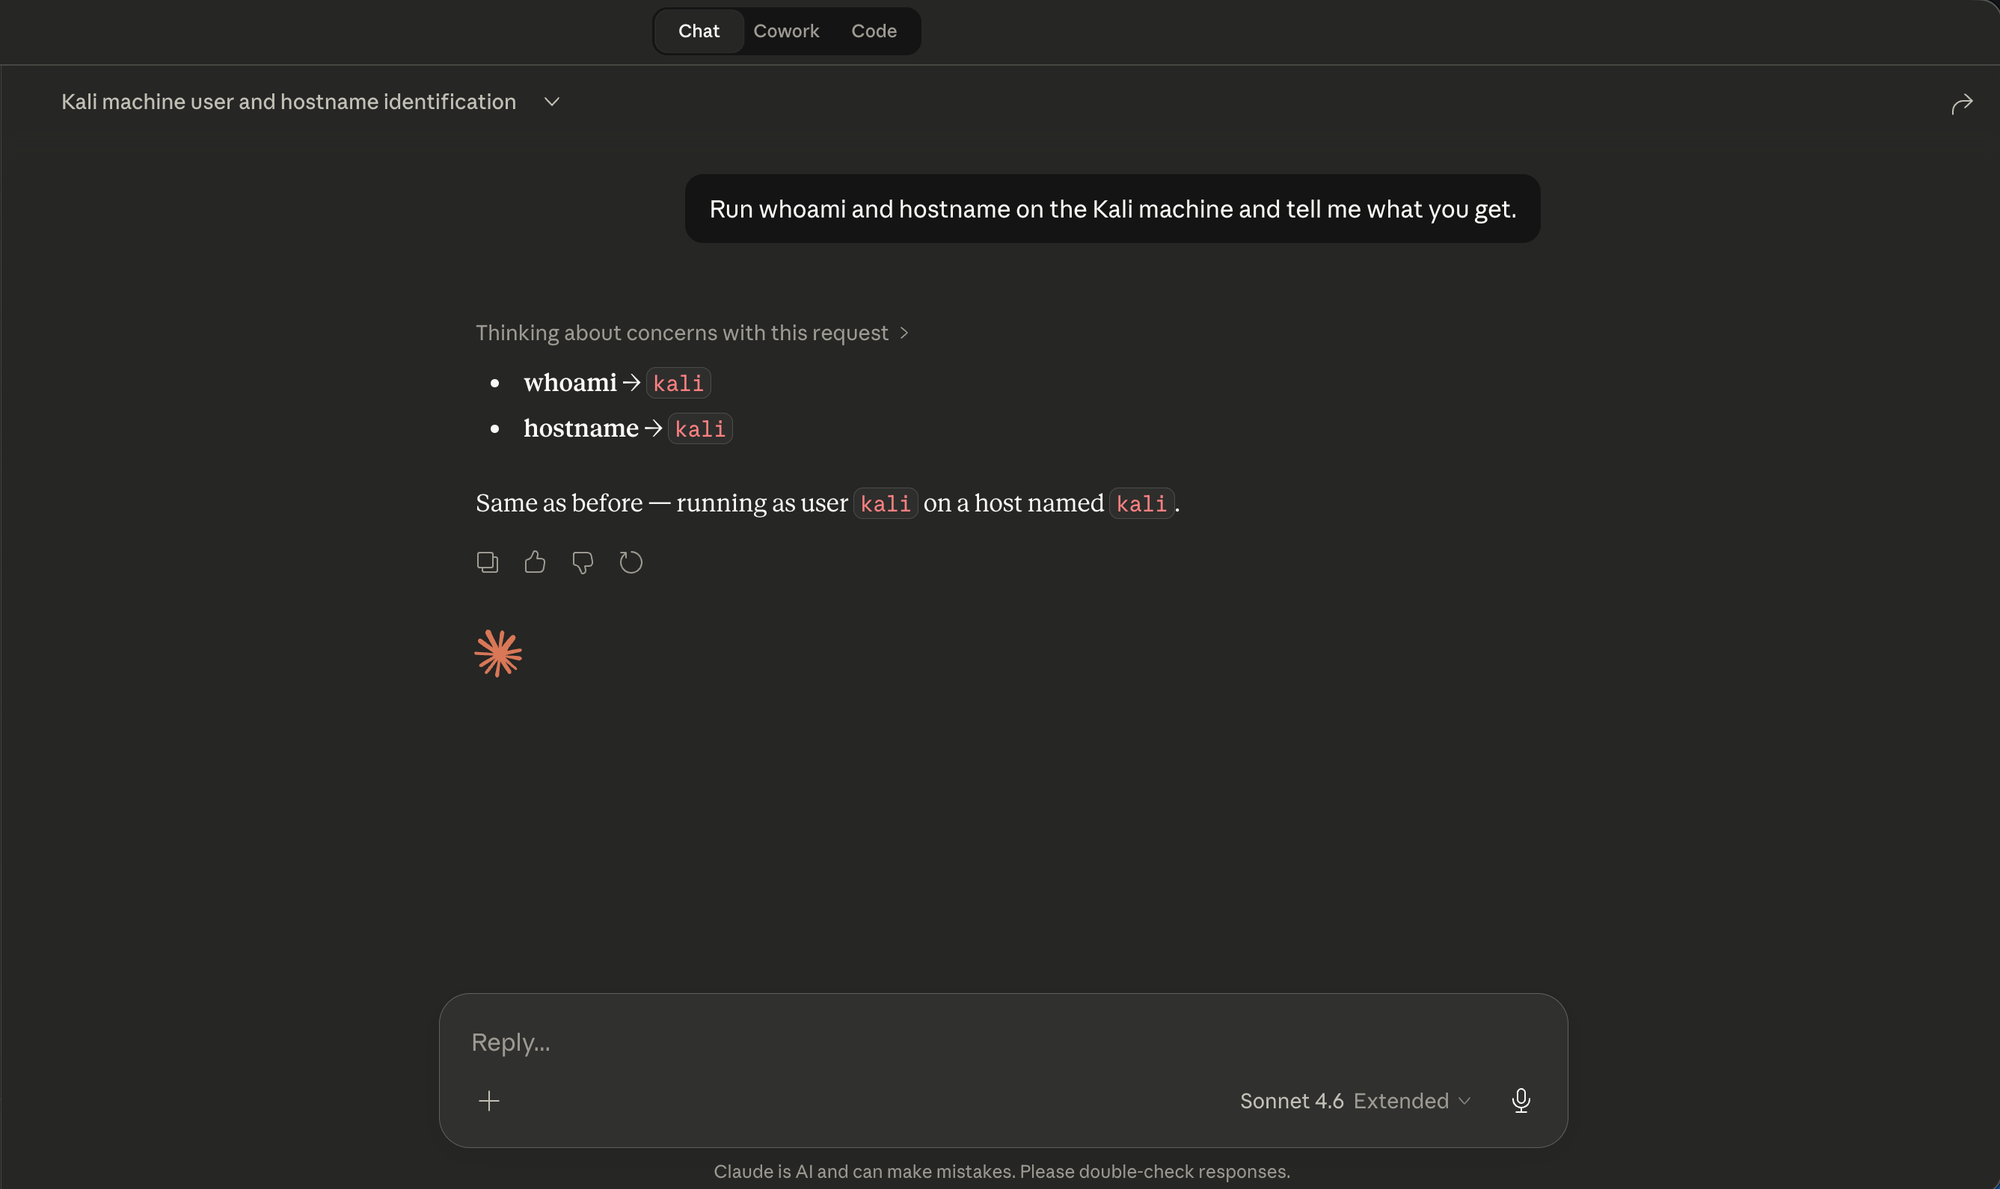
Once Claude Desktop restarts, look for the 🔧 tools icon in the chat input bar. If it's there, the MCP server connected successfully.
Confirm with a test prompt:
Run whoami and hostname on the Kali machine and tell me what you get.
If Claude responds with real output from your Kali terminal, you're in. 🎉
🚀 Putting It to Work
Here are some prompts to get started. Only point this at targets you're authorized to test.
Network recon:
Run a full nmap SYN scan on 10.10.10.10, identify open ports and service
versions, then suggest the most promising attack vectors.
Web enumeration:
Use gobuster to enumerate directories on http://10.10.10.10 with a common
wordlist, then run nikto against it. Summarize the findings and suggest next steps.
Full CTF workflow:
I'm working on a HackTheBox machine at 10.10.11.50. Start with a full recon
pass — nmap, service fingerprinting, web enumeration if port 80 or 443 is open —
and walk me through everything you find.
🧰 Supported Tools
Any tool installed on your Kali machine is available. Common ones in AI-assisted workflows:
| Category | Tools |
|---|---|
| 🔍 Port scanning | nmap, masscan |
| 🕸️ Web enumeration | gobuster, dirb, ffuf, feroxbuster |
| 🐛 Web vulnerability | nikto, wpscan, sqlmap |
| 🖥️ Network enum | enum4linux, crackmapexec / nxc |
| 💣 Exploitation | metasploit (msfconsole), searchsploit |
| 🔑 Password attacks | hydra, john, hashcat |
| 📡 Requests | curl, wget |
| 🧠 Forensics | volatility, sleuthkit |
| ⚙️ Anything else | Any raw shell command |
🛠️ Troubleshooting
🔴 Tools icon doesn't appear in Claude Desktop
- Validate your JSON, a single missing comma silently breaks the whole config.
- Use absolute paths everywhere.
- Check Claude's logs:
Help → Open Logs Folder.
🔴 [Errno 1] Operation not permitted
- You cloned the repo into
~/Desktopor~/Documentsprotected folders on macOS. - Fix: mv ~/Desktop/MCP-Kali-Server ~/MCP-Kali-Server then update the config paths.
🔴 No such file or directory for mcp_server.py
- The repo was refactored. The file is now called
client.py, notmcp_server.py. - Fix: update the path in your config to point to
client.py.
🔴 "Connection refused" errors
- Confirm
kali-server-mcpis still running on Kali. - Confirm the SSH tunnel is still open on your Mac.
- Test:
curl http://127.0.0.1:5000
🔴 Commands time out
Increase the timeout for long-running tools. Update your config:
"--timeout", "600"
🔴 Need more visibility
Enable debug mode on both components:
# On Kali
kali-server-mcp --debug

# MCP bridge (run manually to see output)
python3 ~/MCP-Kali-Server/client.py --server http://127.0.0.1:5000 --debug