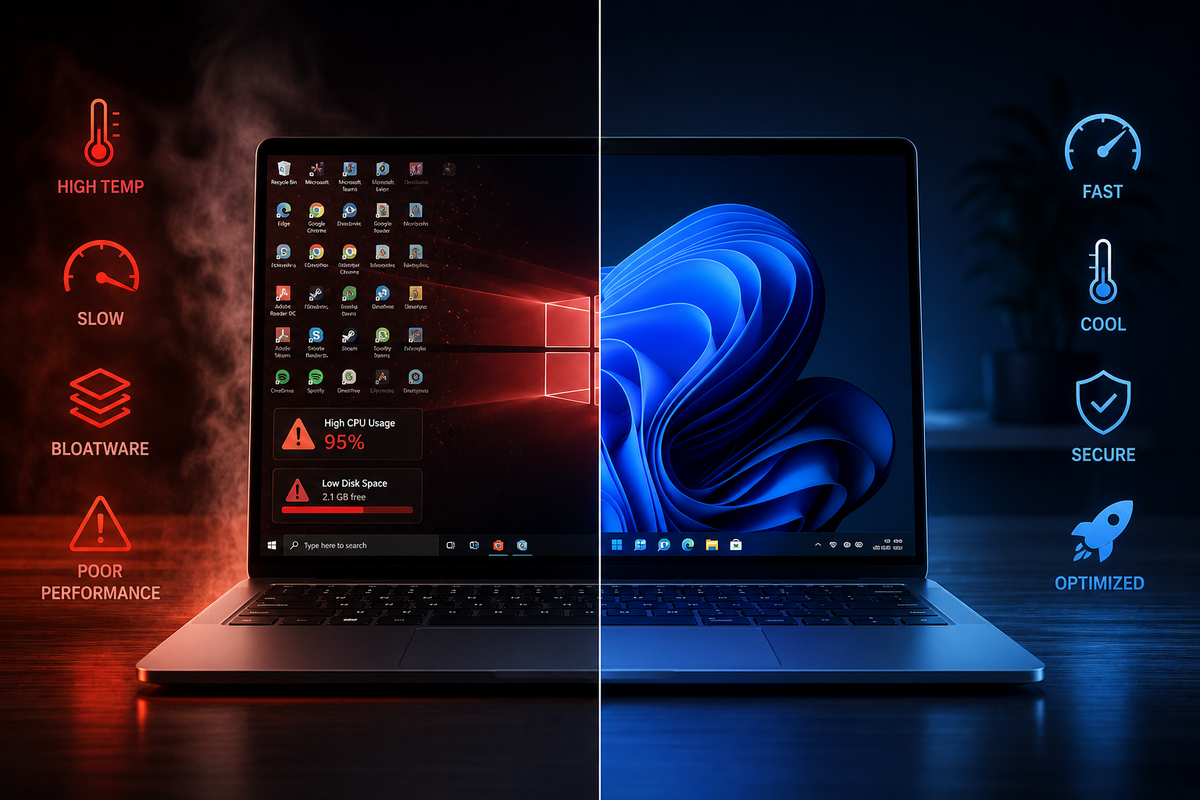
Windows is powerful, flexible, familiar… and sometimes absolutely exhausting.
You install a fresh copy, expecting a clean desktop and a fast machine. Instead, you get preinstalled apps you never asked for, background services you do not understand, telemetry settings scattered across menus, Copilot integrations, ads, “recommendations,” startup clutter, and enough hidden toggles to make a simple cleanup feel like a weekend project.
That is why Windows optimization tools are still so popular. Not because everyone wants to turn their PC into a fragile science experiment, but because a lot of people simply want Windows to feel like their computer again.
The good news is that the free tools available today are much better than the sketchy “one-click speed booster” utilities of the past. The bad news is that they are not all made for the same kind of user. Some are friendly, visual, and safe enough for most people. Others are powerful scripts that expect you to know exactly what you are changing. A few go even further and reshape Windows into something lighter, faster, but also potentially less protected.
So let’s make sense of them.
Below is a practical, reader-friendly guide to the most interesting free Windows optimization tools: what each one does, who it is for, where it shines, where it can bite you, and which one I would recommend depending on your situation.
Before We Start: “Debloating” Windows Is Not Magic
A good optimization tool can remove unwanted apps, disable annoying interface elements, reduce telemetry, clean temporary files, simplify setup after a fresh install, and expose useful Windows settings in one place.
What it cannot do is turn an old dual-core laptop into a gaming monster or magically double your FPS without trade-offs.
The real benefit is usually this: fewer annoyances, fewer background distractions, less clutter, and a system that feels more intentional.
There is also a second rule that matters even more: the more aggressive the tool, the more careful you need to be.
Removing Xbox components, Edge integrations, Defender-related features, Windows Update behavior, telemetry services, widgets, Copilot, OneDrive, or default apps can be useful. It can also break workflows, app dependencies, updates, enterprise policies, or security protections. The “best” optimizer is not the one that deletes the most. It is the one that gives you enough control to remove what you do not want while keeping the system stable.
That is why this list is less about hype and more about choosing the right tool for the right job.
Quick Verdict: The Best Choice for Most People
If you want a simple recommendation, here it is: start with Winhance or Wintoys.
They are approachable, visual, and much less intimidating than running raw scripts. They give normal users a better chance of understanding what is being changed before clicking anything dangerous.
If you are a power user setting up PCs regularly, Chris Titus Tech’s WinUtil is still one of the most useful all-rounders.
If you want maximum control through PowerShell and do not mind reading what the script does, Win11Debloat is a strong option.
If your goal is gaming-focused Windows reduction, AtlasOS is fascinating, but it is not something I would casually recommend for a main everyday machine unless you understand the trade-offs.
If you want to build a smaller Windows installation ISO, tiny11builder is the one to look at.
And if your main frustration is Microsoft’s AI push, Copilot, AI-related integrations, and similar “slop”, then Winslopr is the most targeted tool in this roundup.
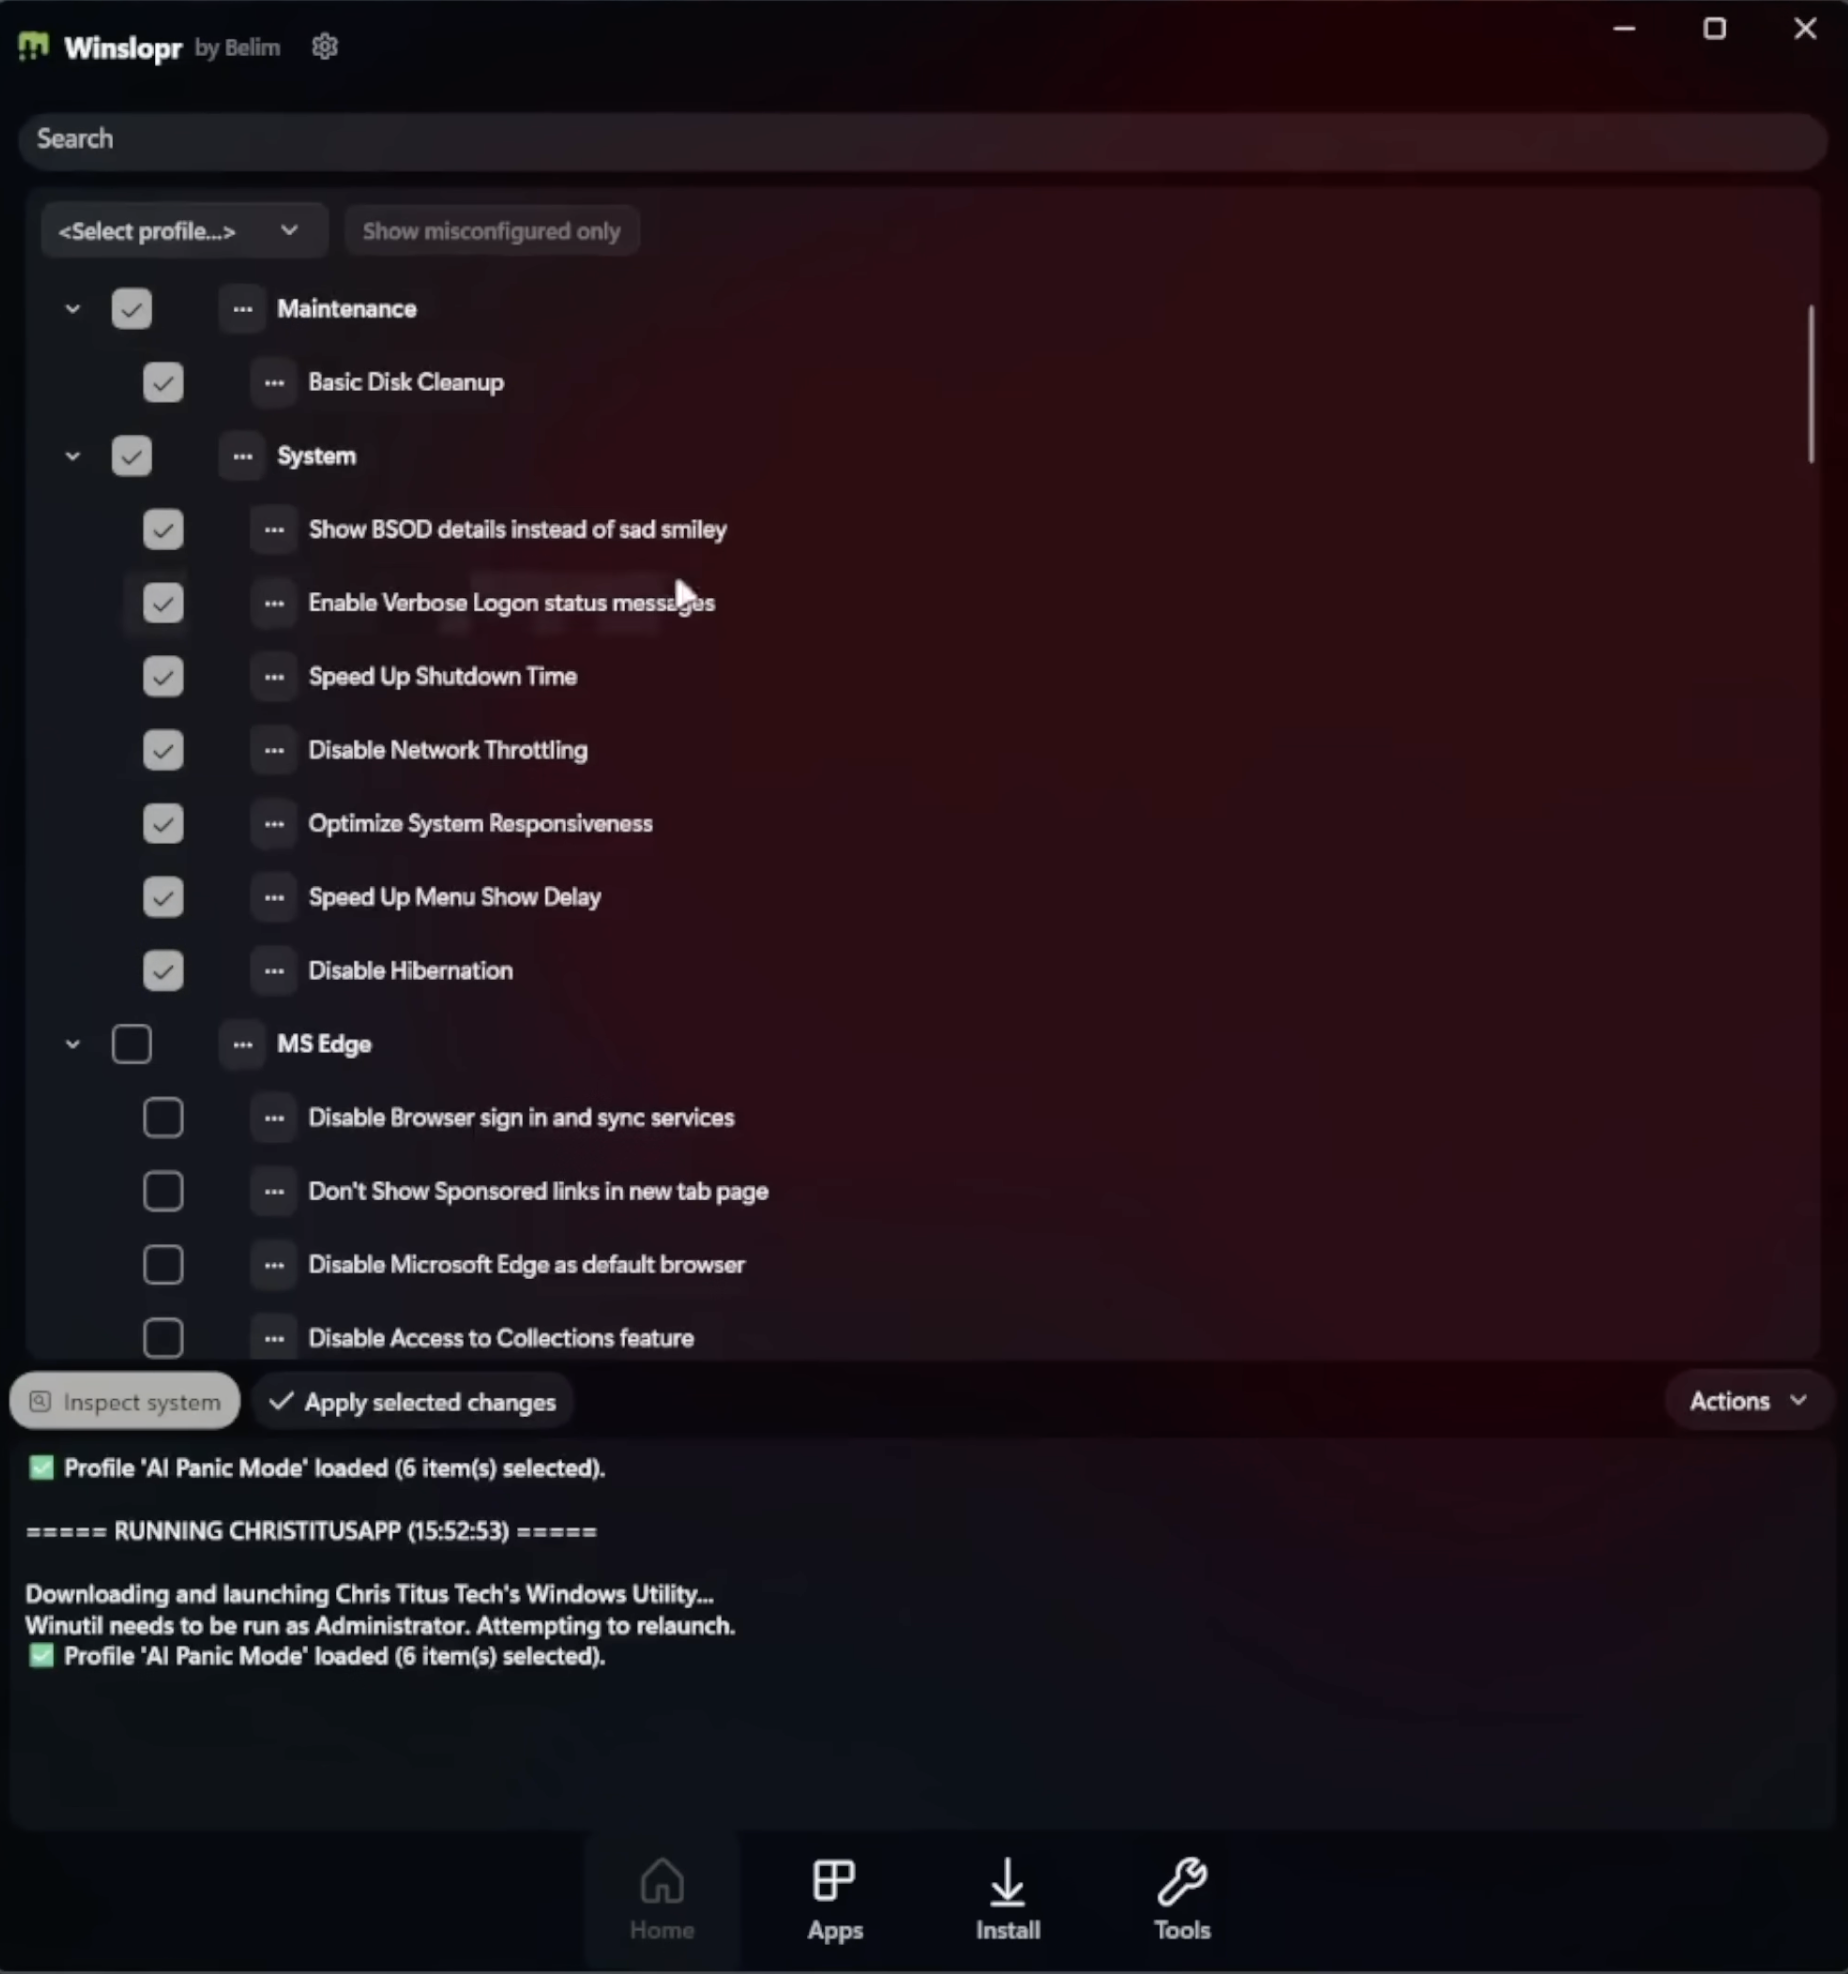
Winslopr: For People Who Want Microsoft’s AI Out of the Way
Winslopr, previously known as Winslop, is one of the more recent and topical tools in this space. Its mission is narrow, and that is exactly what makes it interesting: it focuses on removing or reducing the AI-related clutter Microsoft has been pushing into Windows.
The frustration behind this tool is easy to understand. Many users are not against AI in general. They just do not want the operating system deciding which assistant belongs on their PC. Maybe you use Claude, ChatGPT, Gemini, local models, or nothing at all. The point is that you should get to choose.
That is the role Winslopr tries to fill. It is not trying to be a full Windows tuning suite like Winhance or WinUtil. It is more like a focused cleanup utility for people who look at Copilot and other AI integrations and think: “No thanks, I’ll decide what belongs in my workflow.”
One of the reassuring aspects of Winslopr is that it is designed to show what it intends to change instead of silently doing everything behind your back. That matters because AI-removal tools can touch parts of Windows that may evolve from version to version. A transparent tool is always preferable to a mysterious “fix everything” executable.
Compared with Winhance, Winslopr is less of a general optimizer. Compared with Win11Debloat, it is more focused and less of a broad decluttering script. Compared with Chris Titus Tech’s WinUtil, it is not meant to help you install your favorite apps or tune the whole machine. It exists for one main job: reducing Microsoft’s AI footprint in Windows.
Use Winslopr if your biggest irritation is Copilot and AI integration. Do not use it as your only Windows maintenance tool if your goal is a complete cleanup, app management, service tuning, or post-install setup.
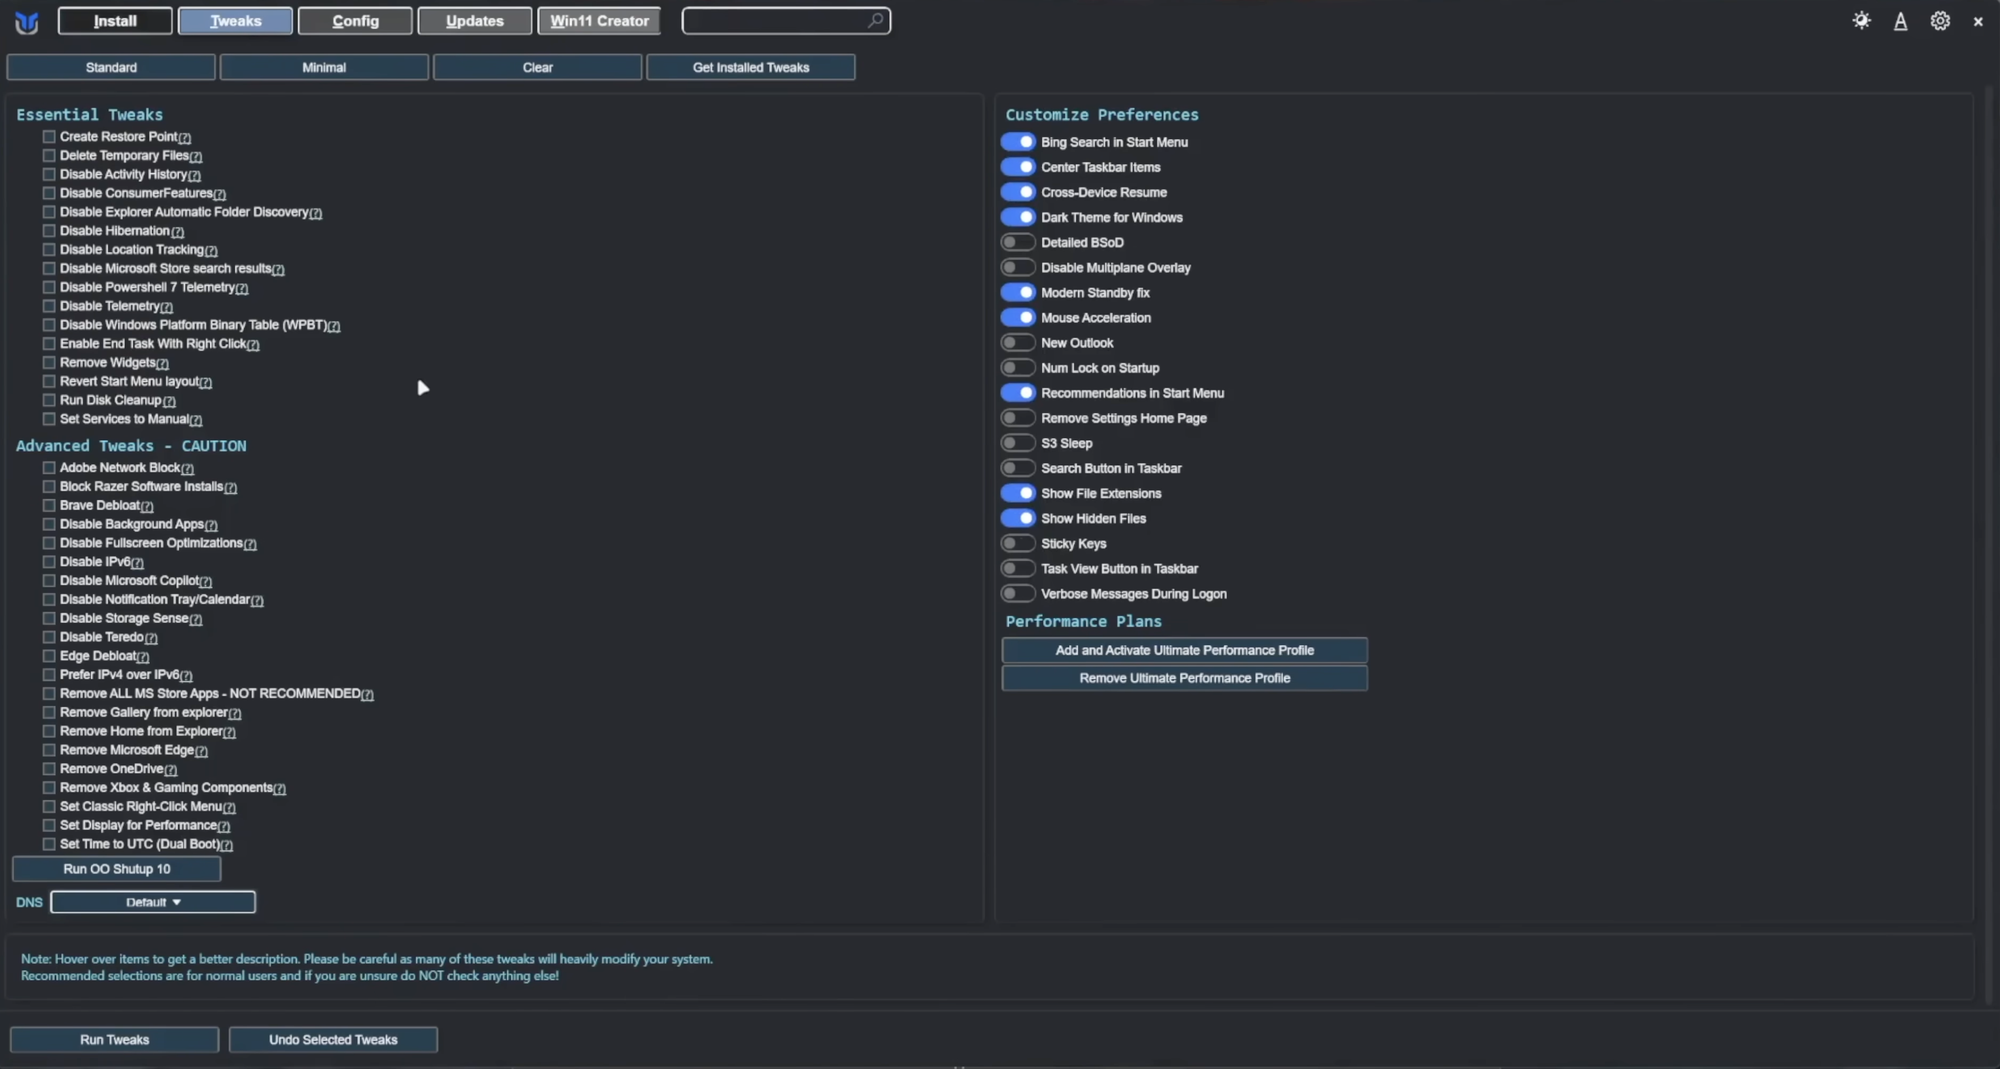
Chris Titus Tech’s WinUtil: The Power User’s Swiss Army Knife
Chris Titus Tech’s WinUtil has become a classic for a reason. It is one of those tools that a lot of enthusiasts keep in their mental toolbox for every fresh Windows installation.
It is not a traditional app you install from the Microsoft Store. Instead, it is usually launched through PowerShell and presents an interface where you can apply tweaks, debloat Windows, install common software, troubleshoot issues, and adjust system behavior.
That makes it especially useful when you have just installed Windows from scratch. Instead of manually downloading your browser, archive manager, media player, developer tools, runtimes, and utilities one by one, WinUtil can streamline that early setup phase. It also offers debloat and optimization options, which makes it more than just a software installer.
The reason WinUtil is so beloved is also the reason some beginners may hesitate: it feels like a power-user tool. It is not impossible to use, but it does expect a bit more confidence than Wintoys or Winhance. You are closer to the system. That is good if you know what you want. It is less good if you simply want a friendly button labeled “make Windows less annoying.”
You can lunch WinUtil quite easily and without prior installations, by opening a PowerShell or Windows Terminal as Administrator, then run:
irm "https://christitus.com/win" | iex
Compared with Winhance, WinUtil feels more utilitarian and technical. Compared with Wintoys, it is less polished as a normal desktop app, but often more flexible for repeat setups. Compared with Win11Debloat, it is broader because it also helps with software installation and general maintenance.
The best use case is simple: if you regularly reinstall Windows, configure machines for yourself or others, or want a mature, open-source utility with lots of practical options, WinUtil deserves a spot near the top of your list.
AtlasOS: The Gaming-Focused Windows Diet
AtlasOS is not just a cleanup app. It is a lightweight modification of Windows designed for enthusiasts, especially gamers, who want fewer background processes, fewer distractions, and a leaner system.
This is where the conversation becomes more serious.
On paper, AtlasOS is extremely appealing. Windows carries a lot of baggage, and gamers are understandably allergic to anything that consumes resources without providing value. If you are building a PC mainly for gaming, the idea of a stripped-down Windows experience sounds fantastic.
AtlasOS aims to improve usability, privacy, and performance by removing or reducing many Windows components and annoyances. It can make Windows feel less bloated, and on some systems that can translate into smoother behavior, fewer background processes, and a cleaner experience.
But there is a trade-off: when an operating system is heavily reduced, you need to understand what was reduced.
Some protections, services, features, compatibility layers, or default Windows behaviors may be changed or removed. That does not automatically mean AtlasOS is “bad.” It means it belongs in a different category from tools like Wintoys or Winhance. You are no longer just toggling a few settings. You are choosing a significantly modified Windows experience.
Compared with tiny11builder, AtlasOS is more gaming- and enthusiast-oriented. Compared with WinUtil or Winhance, it is more radical. Compared with Win11Debloat, it is less about running a cleanup script on your current setup and more about committing to a specific optimized Windows philosophy.
AtlasOS is best for a dedicated gaming PC, a secondary machine, or an enthusiast setup where you are comfortable troubleshooting. I would be much more cautious using it on a work laptop, a family PC, or any system where reliability and standard Windows behavior matter more than squeezing out every possible optimization.

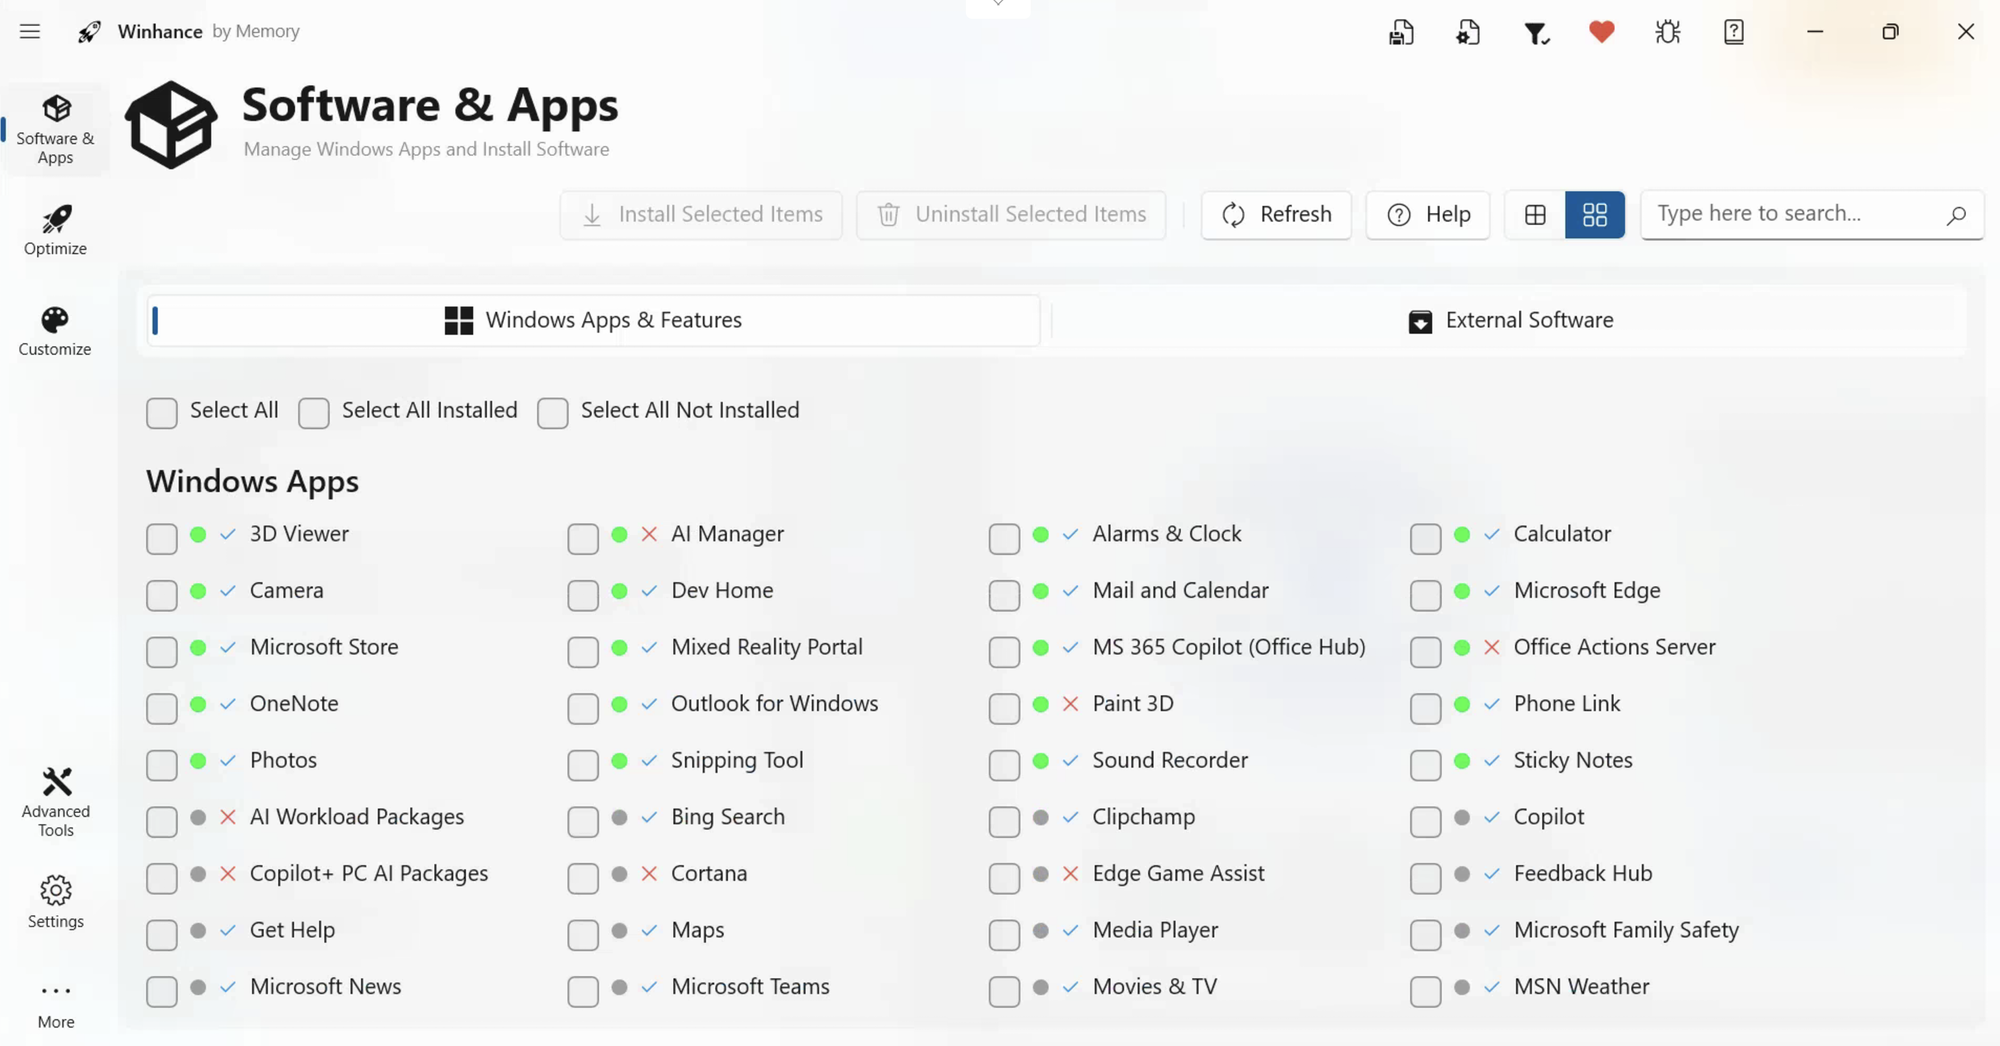
Winhance: The Best Balance of Power and Usability
Winhance is probably the most “normal-user friendly” tool in this roundup while still feeling genuinely powerful.
It is designed to debloat, optimize, and customize Windows 10 and Windows 11 through a clean graphical interface. That matters because the average user does not want to read a PowerShell script line by line. They want to understand categories, see options clearly, and avoid accidentally destroying something important.
Winhance hits a very useful middle ground. It can help remove unwanted Microsoft apps, adjust privacy-related settings, manage software, customize Windows behavior, and apply optimizations without making the whole experience feel like a hacker terminal.
This is why it is easy to recommend. It respects the fact that Windows optimization is not only for hardcore enthusiasts. Plenty of normal users are tired of bloatware, forced features, and messy defaults. Winhance gives them a more approachable path.
Compared with WinUtil, Winhance is friendlier and more visual. Compared with Wintoys, it is similar in spirit but leans more directly into debloating and enhancement. Compared with Win11Debloat, it is much easier to approach because you do not need to live inside PowerShell.
It is also a good recommendation because it does not require you to replace your operating system or build a custom ISO. You can use it on an existing Windows installation and make changes in a more controlled way.
For most readers, Winhance is the tool I would try first.
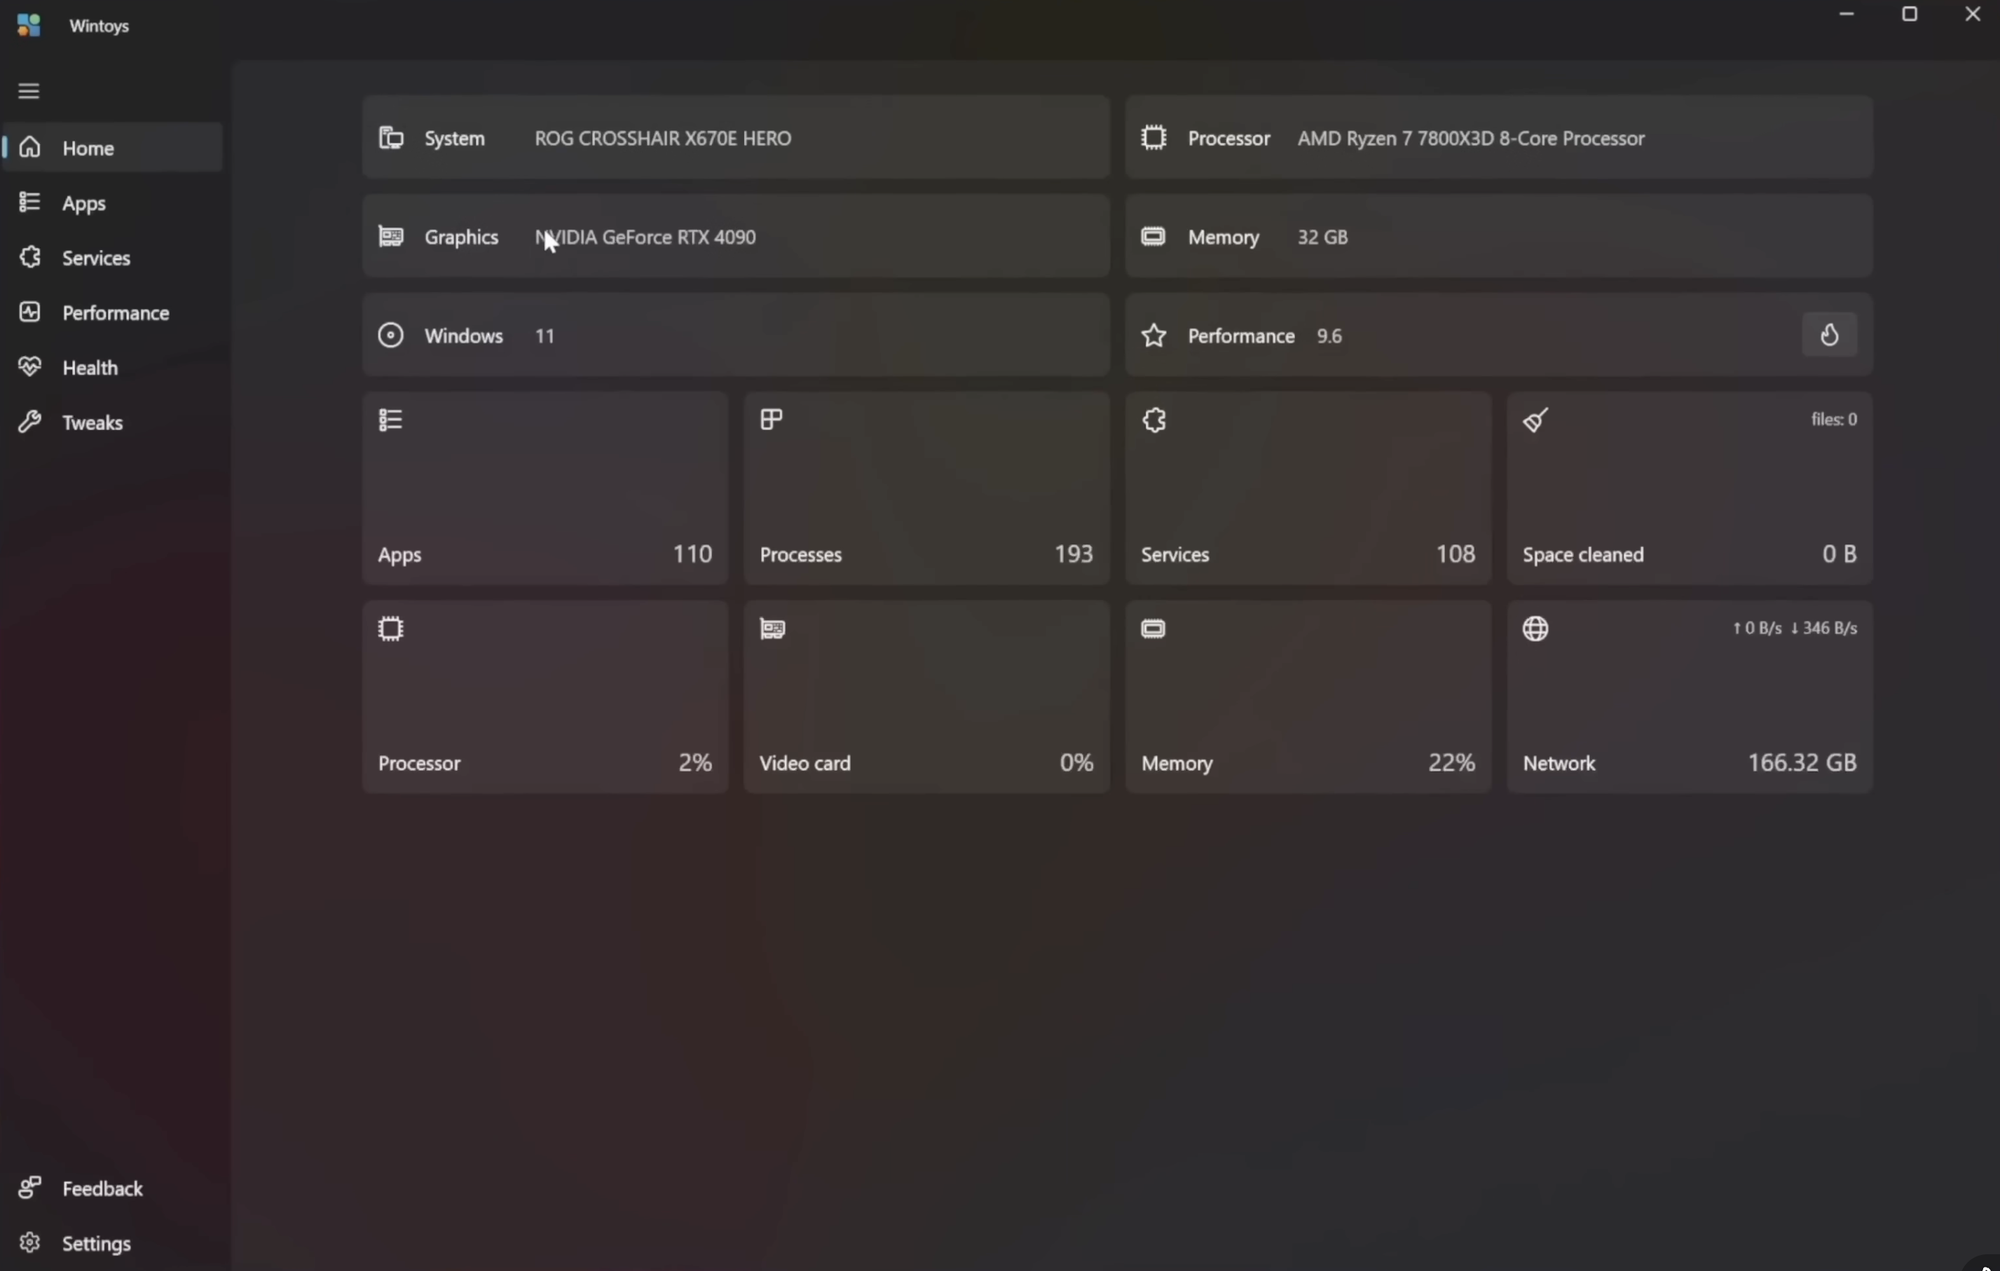
Wintoys: The Friendly Control Panel Windows Should Have Had
Wintoys is another excellent option for users who want a clean interface and practical Windows controls without digging through endless Settings pages.
Its big advantage is accessibility: it is available through the Microsoft Store, which immediately makes it feel less intimidating for casual users. Instead of downloading a script from GitHub and wondering what to run, you install it like a normal app.
Wintoys brings together many useful maintenance and customization features in one place. You can configure Windows, optimize performance-related settings, clean unnecessary files, repair certain system components, and tweak behavior without having to remember where Microsoft buried each option this year.
The best way to think of Wintoys is not as a brutal debloater, but as a friendly Windows management dashboard. It is the kind of tool that makes you wonder why Windows itself does not already offer this level of clarity.
Compared with Winhance, Wintoys may feel slightly more like an all-in-one maintenance and settings hub, while Winhance feels more directly focused on enhancement and debloating. Compared with WinUtil, Wintoys is far easier for beginners. Compared with Win11Debloat, it trades raw script-level control for comfort and readability.
This is the tool I would suggest to someone who says: “I do not want to become a Windows technician. I just want my PC to be cleaner and easier to manage.”
tiny11builder: build your own lightweight Windows 11 ISO
tiny11builder is different from tools like Winhance, Wintoys, and WinUtil because it is not mainly designed to clean up a Windows installation that is already running. Its purpose is more specific: it helps you create a trimmed-down Windows 11 installation image before you install the operating system.
That makes tiny11builder especially interesting for old hardware, virtual machines, test environments, lightweight installations, and special-purpose PCs. Maybe you have an older laptop that no longer feels good as a general-purpose machine, but could still work perfectly as a media box, a basic browsing station, a lightweight office PC, or a low-resource utility machine. In that kind of scenario, installing a smaller and cleaner version of Windows can make a lot of sense.
The key idea is that tiny11builder lets you generate a reduced Windows 11 ISO from legitimate Windows installation media, rather than encouraging you to download random unofficial Windows ISOs from the internet. That distinction is important. Downloading modified operating system images from unknown sources is a terrible security habit, because you have no real way of knowing what has been changed, removed, or added. Building your own image from a trusted Windows ISO is a much safer approach.
The project is now PowerShell-based and is designed to work with any Windows 11 release, language, and architecture. According to the official repository, the regular tiny11maker.ps1 script removes a lot of preinstalled bloat while keeping the system serviceable, meaning you can still add languages, updates, and features later. There is also a more aggressive tiny11Coremaker.ps1, but that one is intended mainly for quick testing or development environments because it removes serviceability: you cannot add languages, updates, or features after creating the image. For most people, the regular tiny11maker.ps1 script is the one to use.
There is also a practical bonus: tiny11builder can help prepare an installation image that is much more convenient to deploy. When you are working with older machines, test systems, or devices that need specific drivers, this kind of workflow can save time because you are preparing the installation media in advance instead of fixing everything manually after setup. It is not the same as a full post-install setup utility, but it fits very well into a cleaner installation process.
Compared with AtlasOS, tiny11builder is less about creating a gaming-focused Windows experience and more about producing a compact Windows installation image. Compared with Winhance and Wintoys, it acts before installation rather than after. Compared with WinUtil, it is not a “set up my apps and apply tweaks” tool; it belongs earlier in the workflow, when you are still preparing the Windows ISO itself.
To run it, download an official Windows 11 ISO from Microsoft, mount it in Windows Explorer, then open PowerShell 5.1 as Administrator. Go to the folder where you extracted tiny11builder and temporarily allow scripts to run for the current PowerShell session:
Set-ExecutionPolicy Bypass -Scope Process
This does not permanently change your system-wide execution policy; it only applies to the current PowerShell session.
Then start the script by pointing it to the mounted Windows ISO drive letter and to a scratch/work drive:
.\tiny11maker.ps1 -ISO D -SCRATCH C
In this example, D is the drive letter of the mounted Windows 11 ISO, while C is used as the scratch drive. Replace those letters with the correct ones for your system. During the process, the script will ask you which Windows edition you want to use. When it finishes, it will create a new file called tiny11.iso in the folder where the script was extracted.
The important thing is to use tiny11builder when you actually know why you need a smaller Windows ISO. For a normal modern PC, I would not necessarily start here: Winhance, Wintoys, or WinUtil are easier and safer choices for most users. But for old hardware, virtual machines, labs, test benches, compact installs, or specialized systems, tiny11builder can be extremely useful.
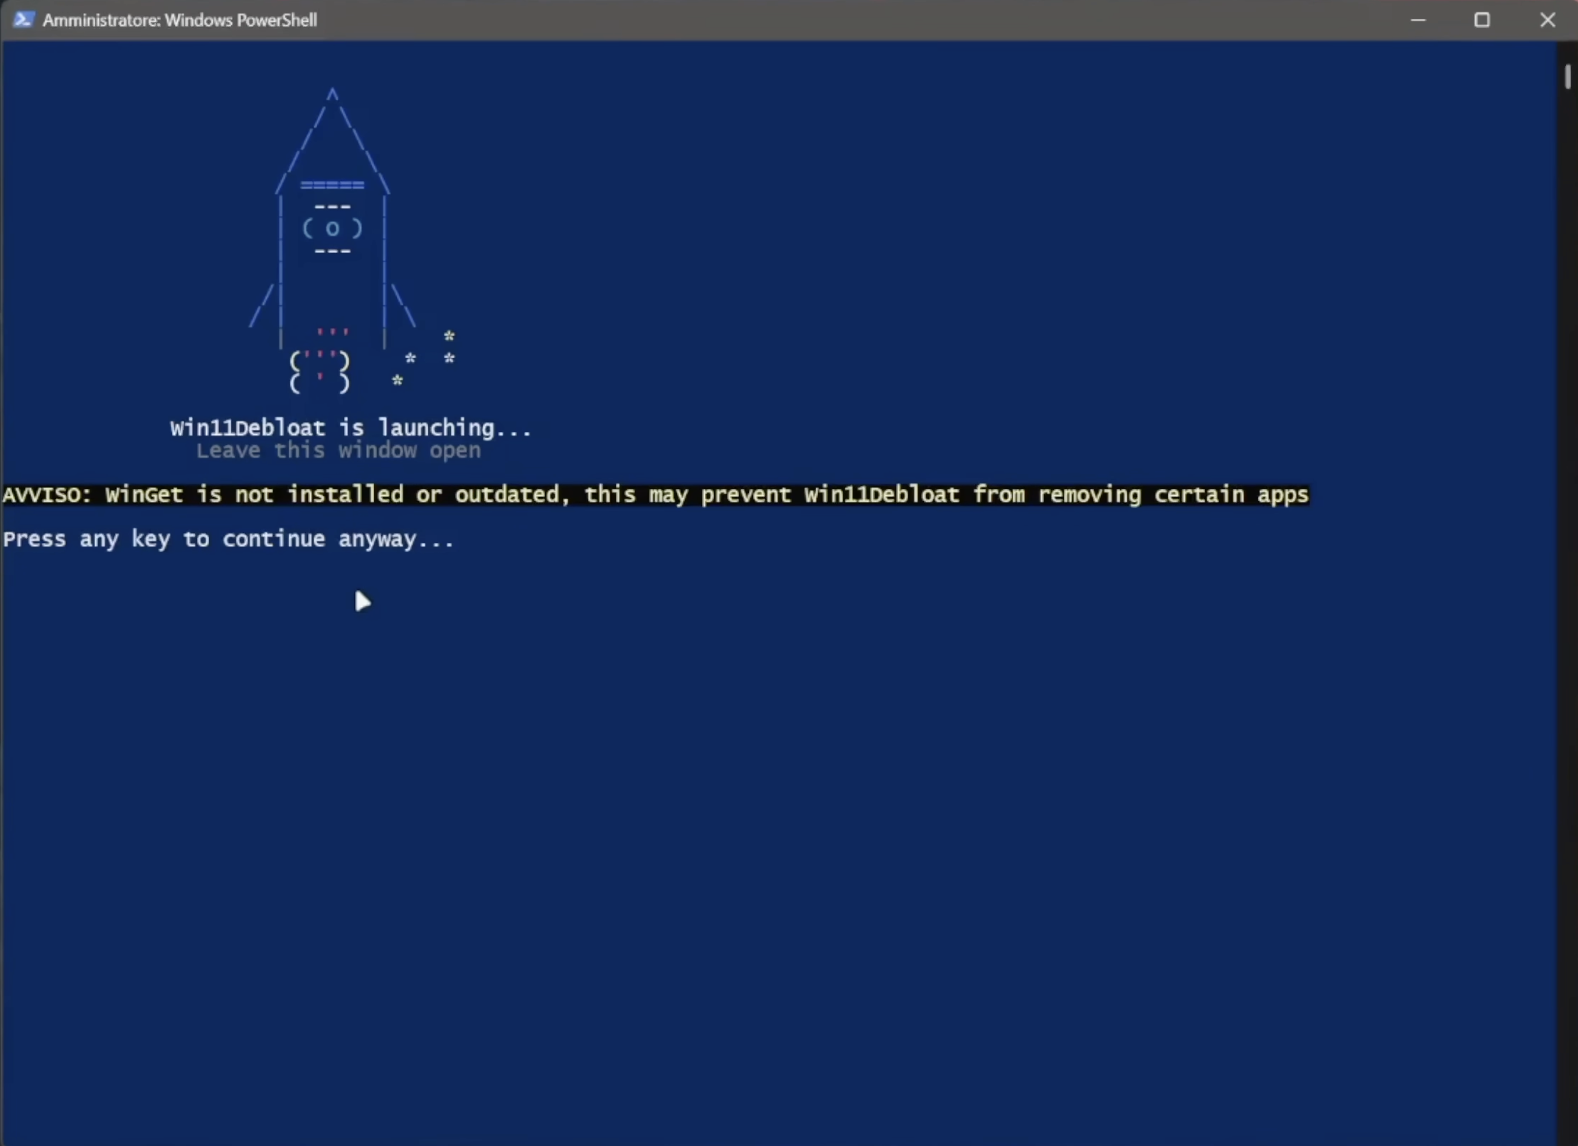
Win11Debloat: The Direct PowerShell Approach
Win11Debloat is one of the most direct tools in this list. It is not a full Windows customization suite like Winhance, it is not a post-install “setup everything for me” utility like WinUtil, and it is not an ISO-building tool like tiny11builder. Instead, Win11Debloat focuses on one clear job: helping you remove Windows clutter quickly, using a lightweight PowerShell script.
That makes it especially interesting if you want a cleaner Windows installation without installing a traditional program. Win11Debloat can remove preinstalled bloatware apps, disable telemetry, turn off intrusive suggestions and ads, remove or disable Microsoft Copilot-related features, clean up parts of the interface, and apply several quality-of-life tweaks. It works on both Windows 10 and Windows 11, although some options are naturally more useful on Windows 11 because that is where Microsoft has pushed more interface clutter, AI integrations, recommendations, and promotional content.
The biggest advantage of Win11Debloat is that it sits in a nice middle ground. It is more technical than Winhance or Wintoys because you are launching a PowerShell script, but it is still much easier than manually editing the registry, removing apps one by one, or hunting through dozens of Windows settings pages. When launched normally, it gives you an interactive setup wizard where you can choose what to remove, what to disable, and which changes to apply. Before applying the selected tweaks, it also lets you review the pending changes and create a system restore point.
This is important because debloating Windows should never mean blindly deleting everything. The best debloat tool is not necessarily the most aggressive one; it is the one that removes the obvious junk while keeping the system usable, updateable, and easy to recover. Win11Debloat is interesting for exactly that reason: it gives you a practical way to clean up Windows without turning the whole process into a dangerous guessing game.
Compared with Winhance, Win11Debloat feels more script-oriented and less like a polished graphical application. Winhance is easier to recommend to casual users because of its friendly interface and broader “Windows improvement” approach. Compared with Wintoys, Win11Debloat is less app-like and more direct: you run it, choose your cleanup actions, apply them, and you are done. Compared with WinUtil, it is more focused on debloating and Windows cleanup, while WinUtil also shines as a broader post-install toolkit for installing apps, applying tweaks, and setting up a machine quickly.
Win11Debloat is also very different from AtlasOS. AtlasOS is a much deeper Windows modification project, mainly attractive to users who want a stripped-down, gaming-focused system and are willing to accept the trade-offs. Win11Debloat is less extreme. It does not try to reinvent Windows; it tries to make a normal Windows installation less annoying.
To launch Win11Debloat quickly, open PowerShell or Windows Terminal, preferably as Administrator, and run the official quick-start command:
& ([scriptblock]::Create((irm "https://debloat.raphi.re/")))
This command downloads and starts Win11Debloat automatically. According to the official documentation, the downloaded files are placed temporarily in %temp%/Win11Debloat and cleaned up when the script is finished.
If you prefer the traditional method, you can download the latest release from GitHub, extract the ZIP file, open the Win11Debloat folder, and double-click:
Run.bat
Windows will ask for administrator permission through UAC, which is required because the script needs elevated privileges to remove apps and apply system-level changes.
Advanced users can also run the script manually from PowerShell. After downloading and extracting the project, open PowerShell or Terminal as Administrator, move into the extracted folder, and temporarily allow scripts for the current PowerShell session:
Set-ExecutionPolicy Unrestricted -Scope Process -Force
Then run:
.\Win11Debloat.ps1
This execution-policy change applies only to the current PowerShell session, so it does not permanently weaken your system settings.
For most users, the quick-start command is the easiest way to launch it. For people who want to inspect the files first, keep a local copy, or run the script with more control, the manual PowerShell method is better.
Use Win11Debloat if you want a focused cleanup tool that removes bloat, disables telemetry, reduces ads and suggestions, and makes Windows feel less noisy without rebuilding the whole operating system. For non-technical users, Winhance or Wintoys may feel friendlier. For power users who want a fast, scriptable, open-source cleanup tool, Win11Debloat is one of the most practical options in the entire list.
So, Which One Should You Actually Use?
The best tool depends less on the tool and more on your personality.
If you want the easiest route, choose Wintoys. It feels like a friendly Windows control center, and it is hard to beat the convenience of installing it from the Microsoft Store.
If you want the best balance between usability and serious debloating, choose Winhance. It is powerful enough to be useful, but approachable enough that you do not feel like you are defusing a bomb.
If you reinstall Windows often or configure PCs regularly, choose Chris Titus Tech’s WinUtil. It is one of the most practical tools for quickly turning a fresh Windows installation into a usable machine.
If you specifically hate Microsoft’s AI integrations, choose Winslopr. It is focused, timely, and built around removing that particular layer of Windows annoyance.
If you want a compact Windows installation image, choose tiny11builder. It is especially useful for old PCs, virtual machines, and specialized setups.
If you want a gaming-oriented modified Windows environment, consider AtlasOS, but treat it as an enthusiast project, not a casual cleanup app.
If you want a lightweight PowerShell debloater and you are comfortable with scripts, choose Win11Debloat.
My Recommended Ranking
For most people, my ranking would look like this:
- Winhance — best overall balance of power, clarity, and usability.
- Wintoys — best for beginners and casual users.
- Chris Titus Tech’s WinUtil — best for power users and fresh installs.
- Win11Debloat — best script-based debloater for advanced users.
- Winslopr — best targeted tool for removing Microsoft AI clutter.
- tiny11builder — best for building lightweight Windows images.
- AtlasOS — most interesting for gaming-focused enthusiasts, but also the one I would approach with the most caution.
That ranking is not about which tool is “most powerful.” If it were, the order would look different. It is about which tool I would feel comfortable recommending to the widest number of people.
A Few Safety Rules Before You Debloat Anything
Before touching Windows with any optimizer, create a restore point. Better yet, make a full backup if the machine matters. Debloaters and optimization tools can be useful, but they also modify system settings, remove apps, change registry keys, and disable services. Most of the time everything goes fine, but having a recovery path is what separates a smart cleanup from a risky experiment.
The fastest way to create a restore point is through PowerShell. Open Windows Terminal or PowerShell as Administrator and first make sure System Restore is enabled for your main Windows drive:
Enable-ComputerRestore -Drive "C:\"
Then create a restore point:
Checkpoint-Computer -Description "Before Windows Optimization" -RestorePointType "MODIFY_SETTINGS"
This gives you a rollback point before applying tools like Winhance, WinUtil, Win11Debloat, or any other optimizer.
To see the restore points available on your system, run:
Get-ComputerRestorePoint
You will see a list of restore points with their sequence numbers, descriptions, and creation dates.
If you need to restore the system later, the easiest and safest method is to open the System Restore interface:
rstrui.exe
From there, select the restore point you created before the optimization, confirm, and let Windows reboot and restore the previous system state.
Advanced users can also start a restore directly from PowerShell by using the sequence number shown by Get-ComputerRestorePoint:
Restore-Computer -RestorePoint 123
Replace 123 with the correct restore point sequence number. Windows will restart and begin the recovery process.
One important note: Windows may limit how frequently restore points can be created. If you run Checkpoint-Computer multiple times in a short period and nothing new appears, that is usually why. In that case, use the existing restore point or wait before creating another one.
A restore point is useful, but it is not the same as a full backup. If the PC contains important work files, client projects, photos, source code, or anything you cannot afford to lose, make a real backup before experimenting. A restore point can help recover system settings and Windows configuration, but a full backup protects your actual data.
Download tools only from their official websites, official GitHub repositories, or the Microsoft Store. Avoid random mirrors, repackaged installers, “portable” versions from unknown sites, and modified ISOs shared on forums.
Do not apply every tweak just because it exists. If you do not use OneDrive, remove it. If you rely on it for documents, do not. If you never use Xbox features, disable them. If you use Game Pass, be careful. If you want to reduce telemetry, go ahead, but understand that some enterprise, update, diagnostic, or Store-related features may expect certain services to exist.
The cleanest Windows installation is not the one with the most components removed. It is the one that removes the things you genuinely do not need while preserving the things that keep the system stable, secure, and convenient.